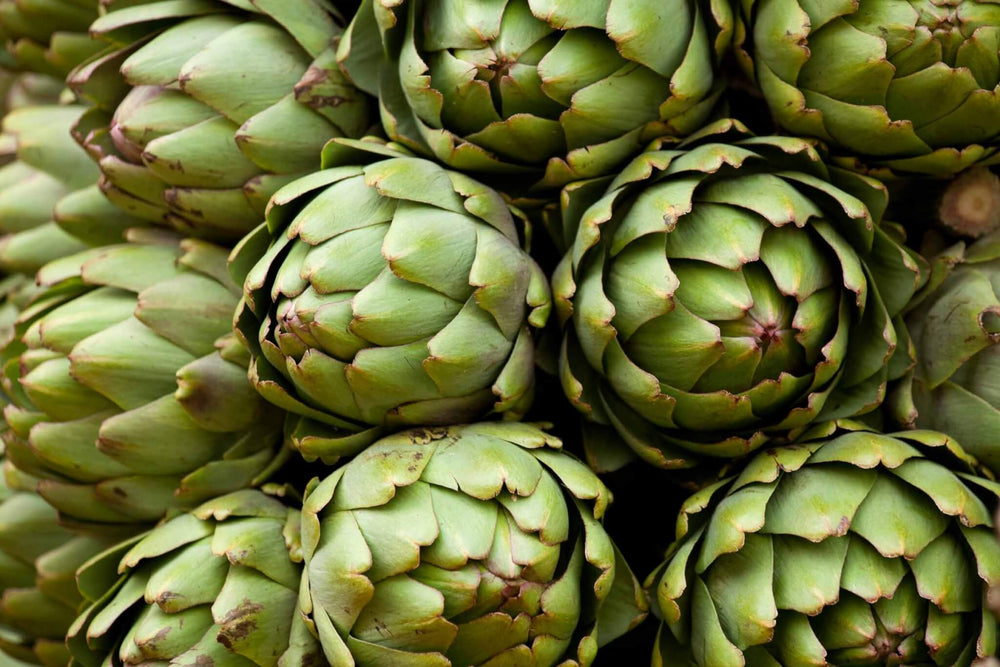
Globe artichoke is an heirloom vegetable grown for its tender, edible flower buds. With their large, silvery-green leaves and thick stems topped with pinecone-like flower buds, artichoke plants add a strong architectural element to vegetable garden plantings. Thomas Jefferson reportedly raised artichokes at Monticello, his Virginia home, as early as 1767. Today the majority of commercial artichoke production is along coastal sections of Central California, where the weather suits them perfectly. Here are some things you need to know about growing artichokes. Artichoke plants thrive best where mild winters and cool, foggy summers prevail. In such growing conditions, they are perennials, yielding harvests for up to 5 years. Where winters dish up only a few frosty nights, plants will sometimes overwinter when pruned and mulched (zones 8 and 9). In colder regions, you have to treat artichokes as annuals planted in spring. They are best planted in fall in the humid, subtropical, frost-free areas of zones 10 and 11.
Quick Guide to Growing Artichokes
- If artichokes are perennial to your region, think long term about where to plant them because they'll grow in that spot for up to 5 years.
- Plant artichokes 4 feet apart in an area with full sun to partial shade and nutrient-rich, loamy soil.
- Improve nutrition and texture of native soil by working in compost or other rich organic matter.
- Water right after planting and provide consistent soil moisture throughout the growing season by watering when the top inch of soil is dry.
- For fantastic results come harvest time, mix a continuous-release plant food into the soil during planting and reapply per label instructions.
- Block weeds and retain soil moisture by adding a 4-inch layer of mulch made from organic material (such as straw, dry grass clippings, or aged manure) to prevent weeds.
- Once buds start to form, remove the mulch and add a 4-inch layer of compost.
- Harvest artichoke buds when they're about 3 inches in diameter; they should be tightly packed and firm.
Soil, Planting, and Care
In zones where artichokes are perennial, select your site considering that plants will be in place for up to 5 years. Give plants room to spread, since mature plants can reach 3 to 4 feet tall and up to 4 feet wide. Artichokes thrive in full sun to partial shade. They also need light, fertile, well-drained soil—sandy or loam is ideal. For in-ground gardens, prepare the soil by working 3 inches of aged compost-enriched Miracle-Gro® Performance Organics® All Purpose In-Ground Soil into the top 6 inches of native soil. Two reasons artichoke plants fail are summer drought and winter soil that's waterlogged. Adding compost improves soil's ability to retain water in summer and drain in winter.
Artichokes can also grow well in large containers. Choose a pot or half whiskey barrel that is 24 inches in diameter (measure across the top). Fill it with Miracle-Gro® Performance Organics® All Purpose Container Mix, which provides potted plants' roots with the ideal growing environment.
Plant artichoke seedlings atop the amended soil, spacing plants 4 feet apart. For best results, choose vigorous young
If you're looking for an amazing harvest, you'll want to add fertilizing with premium plant food to using great soil and strong plants. Feed growing artichokes regularly with Miracle-Gro® Performance Organics® Edibles Plant Nutrition Granules, following label directions. This will not only feed your plants, but also nourish the soil microbes that help your artichoke plants get more nutrition from the soil. Also be sure to keep soil moist throughout the growing season.
Keep weeds out of artichoke beds. Give plants a thick mulch, especially in northern growing areas. Mulch with an organic material, such as dry grass clippings, straw, aged manure, or a mixture of these. As buds begin to form, remove mulch, and apply a 4-inch-thick layer of compost around each plant, extending from the base of the plant outward 12 inches.
Troubleshooting
Artichoke has few problems. Slugs may attack young foliage, and a disease called botrytis blight can coat older leaves. Beat slugs with slug bait or slug traps. If only a few leaves are infected by botrytris blight, remove and destroy them. Treat the plant with a fungicide such as neem oil (available online and at gardening centers).


Harvest and Storage
Flower buds form in early summer atop tall stems that soar out of the center of the plant. Each stem forms several flower buds, with the top bud ripening first. Harvest buds while they're tight and firm and hopefully at least 3 inches in diameter; if buds begin to open, they lose their tenderness. Fully open buds are inedible but produce striking, large, lavender flowers. Cut a 1- to 3-inch section of stem with each bud to make it easier to handle. The lower buds that develop later won't grow as large as the top bud. When you have harvested all buds on a stem, cut the stem to the ground. For large, established plants, prune the entire plant back by a third to spur a fall harvest.
Artichokes keep in the refrigerator for up to 2 weeks.
Uses
Because harvest increases with plant age, it's best to try to "overwinter" artichoke plants using one of the techniques below. (Some gardeners have reported success at overwintering plants as far north as zone 5 using the techniques described for zones 6 and 7.)
For zones 8 and warmer: Following fall harvest, cut plants back to ground level or slightly below ground level. Cover with 3 to 4 inches of an organic mulch such as straw or shredded leaves.
For zones 6 and 7: Cut plants back to roughly 12 inches tall. Mound organic mulch over the plants, then cover plants and mulch with an inverted bushel basket. Feel free to use compost as this first mulch layer. Add a layer of mulch (straw is great at this point) over and around the bushel basket. Drape a rainproof cover over the mound, taking care to anchor the edges. In spring, after the ground is no longer frozen and before growth begins, remove the winter covering and add a 1-inch layer of compost or well-rotted manure around the plant.


 Herbs
Herbs
 Vegetables
 Fruit
Fruit
 Flowers
 Succulents
