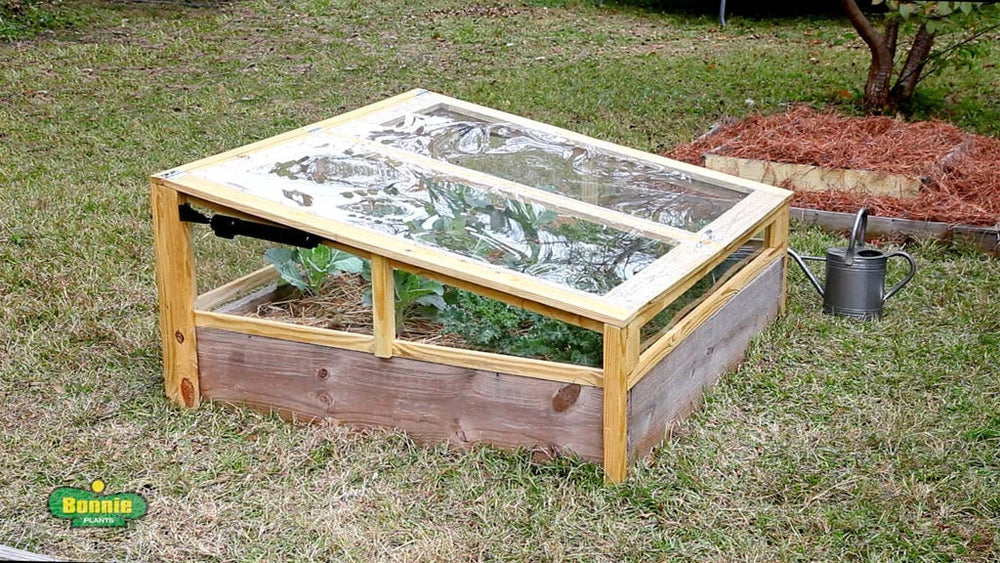
Protect your plants from frost with a simple cold frame that sits right on top of your existing 4′ x 4′ raised bed. The lid is held open with screen door closers, and the entire frame can be moved easily when the weather warms up. Cut the lumber yourself, or have the boards pre-cut at your local home improvement store. Note that you'll want to measure the height of your raised bed and adjust the cold frame leg measurements as needed. If the bed is taller than 9¼ inches, add the difference to the length of the legs; if it's shorter, subtract the difference. Scroll down for instructions, or download our printable PDF guide to building your own Raised Bed Cold Frame.
Estimated Time: 2.5 hours (less if you have wood pre-cut)
Difficulty: Easy


List of Materials:
- 6 – 1 x 2 x 8-foot boards
- 3 – 1 x 4 x 8-foot boards
- 2 – 2 x 2 x 8-foot boards
- 4 – .08 x 2 x 4-foot acrylic sheets
- 2 – 15¾-inch heavy-duty adjustable hold-open pneumatic screen door closers
- 1 – screen door pull
- 4 – packages 2 x ½-inch mending braces
- 2 – packages 1-inch corner braces
- 3 – 2½ -inch narrow utility hinges
- ¾-inch washer-head lath screws
- 1¼-inch deck screws
- 2-inch deck screws
- 3-inch deck screws
List of Tools:
- miter saw or circular saw*
- drill/driver with #10 countersink bit
- jigsaw with fine-tooth blade, heavy-duty utility knife, or plastic cutter (for cutting acrylic)
- clamps
- square
- measuring tape
* or can have lumber pre-cut at home improvement store per dimensions in Parts List
Parts List
| Part | Quantity | Size |
|---|---|---|
| Inside End Stretcher | 2 | 3/4 x 1 1/2 x 7 5/8 |
| Outside End Stretcher | 2 | 3/4 x 1 1/2 x 10 5/8 |
| Top End Rails | 2 | 3/4 x 1 1/2 x 49 1/4 |
| Bottom End Rails | 2 | 3/4 x 1 1/2 x 48 1/4 |
| Short End Stiles | 2 | 3/4 x 1 1/2 x 3 1/2 |
| Long End Stiles | 2 | 3/4 x 1 1/2 x 11 3/4 |
| Front Legs | 2 | 1 1/2 x 1 1/2 x 15 7/16 |
| Back Legs | 2 | 1 1/2 x 1 1/2 x 23 5/8 |
| Front Rails | 2 | 3/4 x 1 1/2 x 51 1/2 |
| Front Stiles | 2 | 3/4 x 3 1/2 x 3 5/16 |
| Rear Rails | 2 | 3/4 x 1 1/2 x 51 1/2 |
| Rear Stiles | 2 | 3/4 x 3 1/2 x 11 3/4 |
| Rear Stretcher | 1 | 3/4 x 1 1/2 x 11 3/4 |
| Rear Legs | 2 | 1 1/2 x 1 1/2 x 23 7/8 |
| Hinge Board | 1 | 3/4 x 1 1/2 x 54 3/4 |
| Front Panel | 1 | 5 3/4 x 48 |
| Side Panels | 2 | 14 3/4** x 48 |
| Back Panel | 1 | 14 1/2 x 48 |
| Lid Rails | 2 | 3/4 x 3 1/2 x 47 1/2 |
| Lid Stiles | 2 | 3/4 x 3 1/2 x 49 |
| Lid Stretcher | 1 | 13/4 x 3 1/2 x 42 |
| Lid Panels | 2 | 24 x 48 |
| **at widest end – refer to cutting diagram for full dimensions |
Cutting Diagram: Wood

Cutting Diagram: Acrylic

Use Figure 1 as a guide for cutting the Inside End Stretchers and Outside End Stretchers.
Position these parts as shown in Figure 2, and attach using 1¼-inch deck screws.
Use Figure 3 as a guide for cutting the Top End Rails.
Position the Top End Rails and Bottom End Rails as shown in Figure 4, and attach to the Outside End Stretchers using 1¼-inch deck screws. Note that these two assemblies should be mirror images of each other.
Use Figure 5 as a guide for cutting the Short End Stiles and Long End Stiles.
Use Figure 6 as a guide for cutting the Front Legs and Back Legs.
Position the parts as shown in Figure 7, and attach using 1¼-inch deck screws. Note that the assemblies should be flush with the top ends (with the 10-degree angles) of the Legs, and are offset by ¾ of an inch, as indicated. Again, these assemblies should be mirror images of each other.
Place these assemblies on your raised bed, as shown in Figure 8.Position the Front Stiles and Front Rails as shown in Figure 9, and attach using 2-inch deck screws driven through the Rails and into the Stiles. Position the Rear Stiles, Rear Stretcher, and Rear Rails as also shown in Figure 9, and attach using 2-inch deck screws driven through the Rails and into the Stretcher and Stiles.
Position these assemblies as shown in Figure 10, making sure they are flush with the top end of the Legs, and attach using 1¼-inch deck screws as shown.
Use Figure 11 as a guide for cutting the Rear Legs
.Position the Rear Legs and Hinge Board as shown in Figure 12. Attach the Rear Legs to the Back Legs using 2-inch deck screws. Attach the Hinge Board to the top end of the Rear Legs using 1¼-inch deck screws, and to the top Rear Rail using 1¼-inch deck screws. Space the hinges equidistantly apart on the Hinge Board and attach. Cut the Front Panel, Side Panels, and Back Panel per the Cutting Diagram. (If using a jigsaw, place masking tape over the cut line to help minimize cracking.)
Set the panels in place and drill pilot holes for the ¾-inch washer-head lath screws. Attach the panels using these screws as shown in Figure 13. Be careful not to drive the screws in too far, as the plastic may crack.
Position the Lid Rails, Lid Stretcher, and Lid Stiles as shown in Figure 14. Attach using mending braces, corner braces, and the screws included in the brace packaging.
Place the Lid Panels on the Lid Assembly; it should be flush against one end and ¾ of an inch from the outer edge. Drill pilot holes for the ¾-inch washer-head lath screws, and attach the panels using the screws as shown in Figure 15. Center the screen door pull on the front Lid Rail and attach, as also shown in Figure 15
.Position the Lid Assembly as shown in Figure 16, and attach the hinges.
Note: Check the acrylic sheet panels periodically for gaps along the edges, as they may form during large swings of warm and cool temperatures. Add additional ¾-inch washer-head lath screws at these points as needed. If cracks form, use clear, small project construction adhesive or clear silicon sealant caulk to repair.
Finished Dimensions of Raised Bed Cold Frame
- Height: 24 7/8* inches
- Width: 51 inches
- Depth: 49 1/2 inches
* at highest point
Design by Chris Hill.


 Herbs
Herbs
 Vegetables
 Fruit
Fruit
 Flowers
 Succulents


