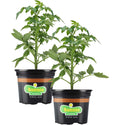
Perhaps more than any other vegetable, tomatoes depend on proper planting so they can provide you with loads of fruit throughout the summer. Before you begin, check out our step-by-step instructions to learn how to become an expert at planting tomatoes.
Step 1: Begin with Bonnie Plants®
Bonnie Plants® leave our greenhouses with healthy foliage and well-developed roots. Be sure to water your new tomato plants before planting.
Step 2: Prepare the Ground
If planting in-ground, loosen the soil to create a welcoming bed for roots to grow. Add agricultural lime if you've done a soil test and the results recommend it. (For more about liming, see "Why Does pH Matter?") In addition, add 3 or 4 inches of compost or other organic matter, especially in clay or sandy soils. If you're going to grow your tomato plant in a container, fill the container with a premium quality potting mix, such as Miracle-Gro® Potting Mix. Then dig a hole that is as deep as the plant is tall because you are going to bury two-thirds of the plant.
Step 3: Remove the Plant from the Pot
Carefully remove the plant by holding it at the base, turning it upside down, and sliding off the pot.
Step 4: Bury Two-Thirds of the Tomato Plant
Set the plant in the hole deeply enough so that two-thirds of it is buried. Laying the plant on its side is okay, but angle it so that very top remains above ground. Roots will sprout all along the buried stem to make a stronger plant. You can pinch off the lower leaves if you prefer, but it is not necessary. When you're done, two-thirds of the entire plant will be buried; only the top of the tomato plant will remain above ground.
Step 5: Fertilize
You've done important work to make sure you're planting in great soil, but there's a complementary step for best results: Mix plant food in with the pile of soil that will go back into the hole. It's best to fertilize according to recommendations from a soil test, but if you don't have that, use a continuous-release fertilizer like Miracle-Gro® Shake ‘n Feed® Tomato, Fruit & Vegetable Plant Food, which will help provide the nutrition your tomato plant will need to produce the best harvest. Be sure to follow label directions.


Step 6: Water Well
It is very important to water in the plant to help settle the soil.
Tip: Consider a Soaker Hose or Drip System
This is optional but recommended: Place a soaker hose or drip irrigation system in your beds or containers for watering. This conserves water, and very importantly, helps keep the foliage dry. Wet foliage encourages diseases, which are the biggest challenge to growing tomatoes in many areas, especially in humid climates.
Step 7: Mulch
Mulch with pine needles, straw, chopped leaves, soil conditioner, or compost to help keep moisture in the soil and prevent weeds. Mulch should be 2 to 3 inches deep for effective weed control. If you use a soaker hose, the hose should be completely covered with 2 to 3 inches of mulch.


 Herbs
Herbs
 Vegetables
 Fruit
Fruit
 Flowers
 Succulents


